本文所分析的DDPM论文以及代码的相关信息如下:
一、 demo.py
首先由__init__初始化一些显示界面的参数,如进度条。
然后进入main()函数,在main()函数中完成了以下任务:
- 数据集、ema多选框、扩散步骤的预设置
get_state()实例化扩散过程,包括加载预训练的扩散模型、$x_T$、以及设定扩散步骤- 实时显示当前图像 $x_t$ 和 cur_step
- 根据页面触发的动作
Denoise和Diffuse来分别调用去噪函数和扩散函数,如下图:
 1def main():
 2    #无关代码已省略 ......
 3    name = st.sidebar.radio("Model", ("cifar10", "lsun_bedroom", "lsun_cat", "lsun_church"))
 4    ema = st.sidebar.checkbox("ema", value=True)
 5    state = get_state(name, ema=ema)
 6    diffusion = state["diffusion"]
 7    #"Number of steps" 默认为1000
 8    n_steps = st.sidebar.number_input("Number of steps", min_value=1,max_value=diffusion.num_timesteps,value=diffusion.num_timesteps)
 9    def callback(x, i, x0=None):
10        if show_x0 and x0 is not None:
11            x = x0
12        output.image(diffusion.torch2hwcuint8(x, clip=clip)[0])
13        step.text("Current step: {}".format(i))
14    callback(state["x"], state["curr_step"])#展示初始图像x_T和cur_step:1000
15
16    denoise = st.sidebar.button("Denoise")
17    if state["curr_step"] > 0 and denoise:#去噪
18        x = diffusion.denoise(1,
19                              n_steps=n_steps, x=state["x"],
20                              curr_step=state["curr_step"],
21                              progress_bar=tqdm_factory,
22                              callback=callback)#调用回调函数实时显示
23        state["x"] = x
24        state["curr_step"] = max(0, state["curr_step"]-n_steps)
25    diffuse = st.sidebar.button("Diffuse")
26    if state["curr_step"] < diffusion.num_timesteps and diffuse:#扩散
27        x = diffusion.diffuse(1,
28                              n_steps=n_steps, x=state["x"],
29                              curr_step=state["curr_step"],
30                              progress_bar=tqdm_factory,
31                              callback=callback)#调用回调函数实时显示
32        state["x"] = x
33        state["curr_step"] = min(diffusion.num_timesteps, state["curr_step"]+n_steps)
其中diffusion模型的实例化在get_state()函数中实现:
1def get_state(name, ema):
2    if ema:#判断是否使用滑动平均指数(ema)
3        name = "ema_"+name
4    diffusion = Diffusion.from_pretrained(name)#加载对应的预训练模型
5    state = {"x": diffusion.denoise(1, n_steps=0),
6             "curr_step": diffusion.num_timesteps,
7             "diffusion": diffusion}
8    return state
至此demo.py的功能基本介绍完毕,下面学习diffusion.py中的Diffusion类,查看具体扩散和去噪的实现。
二、Diffusion类
本文分析的代码是直接调用的预训练好的模型,因此没有训练过程。Diffusion类中实现的功能有:
- 类初始化,定义论文公式计算中需要的各参数
- 加载预训练模型的方法
- 去噪方法和扩散方法
- 保存生成的图片
其中定义的方法如下:
 1class Diffusion(object):
 2    #方法实现代码省略......
 3    def __init__(self, diffusion_config, model_config, device=None):
 4    def init_diffusion_parameters(self, **config):#初始化公式参数
 5    def from_pretrained(cls, name, device=None):#加载预训练模型
 6    def denoise(self, n, n_steps=None, x=None, curr_step=None,
 7                progress_bar=lambda i, total=None: i,
 8                callback=lambda x, i, x0=None: None):#去噪
 9     def diffuse(self, n, n_steps=None, x=None, curr_step=None,
10                progress_bar=lambda i, total=None: i,
11                callback=lambda x, i: None):#扩散
12    def torch2hwcuint8(x, clip=False):#转化图像格式
13    def save(x, format_string, start_idx=0):#保存图像
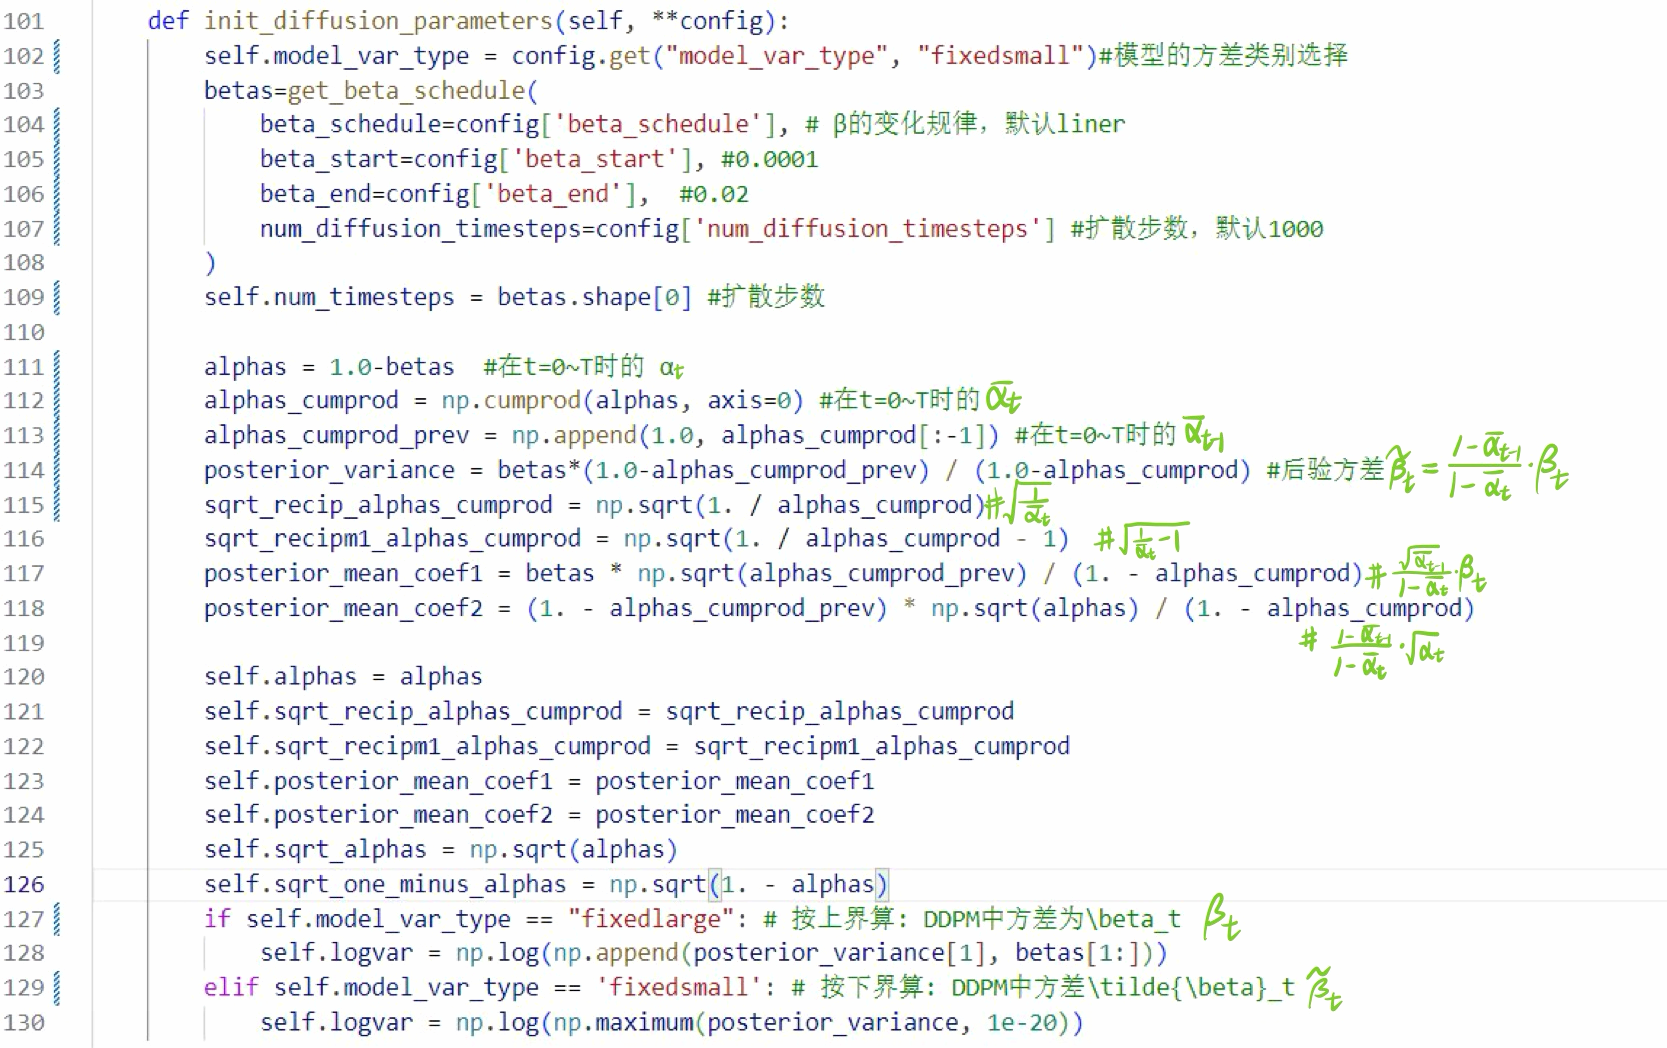
1. init_diffusion_parameters()里面实现了论文公式中计算相关参数的定义,经过初始化后,可以得到相关属性:
- model_var_type —— 对应方差类别
- betas —— $\beta_t$ 相关的计算参数
- logvar —— 方差的对数

其中103行中调用get_beta_schedule()方法来决定 $\beta_{1:T}$ 序列的增长方式:
 1def get_beta_schedule(beta_schedule, *, beta_start, beta_end, num_diffusion_timesteps):
 2    if beta_schedule == 'quad':#二次方增长
 3        betas = np.linspace(beta_start ** 0.5, beta_end ** 0.5, num_diffusion_timesteps, dtype=np.float64) ** 2
 4    elif beta_schedule == 'linear':#线性增长
 5        betas = np.linspace(beta_start, beta_end, num_diffusion_timesteps, dtype=np.float64)
 6    elif beta_schedule == 'warmup10':#预热,训练初期较小,之后修改为预设的方式
 7        betas = _warmup_beta(beta_start, beta_end, num_diffusion_timesteps, 0.1)
 8    elif beta_schedule == 'warmup50':
 9        betas = _warmup_beta(beta_start, beta_end, num_diffusion_timesteps, 0.5)
10    elif beta_schedule == 'const':#常数
11        betas = beta_end * np.ones(num_diffusion_timesteps, dtype=np.float64)
12    elif beta_schedule == 'jsd':  # 1/T, 1/(T-1), 1/(T-2), ..., 1
13        betas = 1. / np.linspace(num_diffusion_timesteps, 1, num_diffusion_timesteps, dtype=np.float64)
14    else:
15        raise NotImplementedError(beta_schedule)
16    assert betas.shape == (num_diffusion_timesteps,)
17    return betas
2. from_pretrained()实现根据不同数据集加载对应预训练模型的功能,以cifar10为例:
 1def from_pretrained(cls, name, device=None):
 2        cifar10_cfg = {  #模型的相关参数设置
 3            "resolution": 32, #图像的分辨率
 4            "in_channels": 3, #输入通道数
 5            "out_ch": 3,      #输出通道数
 6            "ch": 128,        #初始通道数
 7            "ch_mult": (1,2,2,2), #通道数的倍数列表
 8            "num_res_blocks": 2, #残差块数量
 9            "attn_resolutions": (16,), #注意力机制的分辨率列表
10            "dropout": 0.1,    #随机丢弃的比例
11        }
12        lsun_cfg = {...  }
13        model_config_map = {"cifar10": cifar10_cfg,... }
14        diffusion_config = {
15            "beta_schedule": "linear",# β序列的获取方式为线性增长
16            "beta_start": 0.0001,
17            "beta_end": 0.02,
18            "num_diffusion_timesteps": 1000,#扩散步骤
19        }
20        model_var_type_map = { "cifar10": "fixedlarge",
21        "lsun_bedroom": "fixedsmall",...}#方差类别
22        ema = name.startswith("ema_")
23        basename = name[len("ema_"):] if ema else name
24        diffusion_config["model_var_type"] = model_var_type_map[basename]
25
26        print("Instantiating") #实例化中...
27        diffusion = cls(diffusion_config, model_config_map[basename], device)
28
29        ckpt = get_ckpt_path(name)#到对应的下载链接去下载模型
30        print("Loading checkpoint {}".format(ckpt))
31        diffusion.model.load_state_dict(torch.load(ckpt, map_location=diffusion.device)) # 加载模型
32        diffusion.model.to(diffusion.device)
33        diffusion.model.eval()
34        print("Moved model to {}".format(diffusion.device))
35        return diffusion
3. denoise()方法,循环 $T$ 步调用denoising_step()来完成去噪,并且实时显示去噪进度条。但是这里有一个比较疑惑的问题:callback这个回调函数的具体定义在main函数中, 用于实时显示当前图像$x_t$。
 1def denoise(self, n, n_steps=None, x=None, curr_step=None,
 2            progress_bar=lambda i, total=None: i,#lambda函数的用法
 3            callback=lambda x, i, x0=None: None):
 4    with torch.no_grad():
 5      #省略无关代码......
 6        if x is None:  #初始将x_T设为来自高斯分布的随机噪声
 7            x = torch.randn(n, self.model.in_channels, self.model.resolution, self.model.resolution)
 8            x = x.to(self.device)
 9        for i in progress_bar(reversed(range(curr_step-n_steps, curr_step)), total=n_steps):
10            t = (torch.ones(n)*i).to(self.device)
11            #调用denoising_step()进行从x_t到x_{t-1}的去噪
12            x,x0 = denoising_step(x,
13                                 t=t,
14                                 model=self.model,
15                                 logvar=self.logvar,
16                                 sqrt_recip_alphas_cumprod=self.sqrt_recip_alphas_cumprod,
17                                 sqrt_recipm1_alphas_cumprod=self.sqrt_recipm1_alphas_cumprod,
18                                 posterior_mean_coef1=self.posterior_mean_coef1,
19                                 posterior_mean_coef2=self.posterior_mean_coef2,
20                                 return_pred_xstart=True)
21            callback(x, i, x0=x0) #这个定义在main函数中
22        return x
4. diffuse()函数于上面的denoise()函数相似,在这里也是循环 $T$ 步,调用diffusion_step()函数进行前向扩散:
 1 def diffuse(self, n, n_steps=None, x=None, curr_step=None,
 2            progress_bar=lambda i, total=None: i,
 3            callback=lambda x, i: None):
 4    with torch.no_grad():
 5        #省略无关代码......
 6        for i in progress_bar(range(curr_step, curr_step+n_steps), total=n_steps):
 7            t = (torch.ones(n)*i).to(self.device)#[i,i,...,i] i个i
 8            x = diffusion_step(x, t=t,
 9                               sqrt_alphas=self.sqrt_alphas,
10                               sqrt_one_minus_alphas=self.sqrt_one_minus_alphas)
11            callback(x, i+1) # 这个定义在main函数中
12        return x
三、核心函数
1. denoising_step()方法在denoise()第12行被调用,完成了 $p(x_{t-1}|x_t)$ 去噪采样过程,但并不是直接计算论文中的公式(11):
$$x_{t-1}=\frac{1}{\sqrt{\alpha_t}}(x_t-\frac{\beta_t}{\sqrt{1-\bar\alpha_t}}\epsilon_\theta(x_t,t))+\sigma_tz$$
而是通过以下步骤来获取同等效果:
- 首先,得到模型预测的噪声 $\epsilon_\theta(x_t,t)$
- 接着,由公式 $x_t=\sqrt{\bar\alpha_t}x_0+\sqrt{1-\bar\alpha_t}\epsilon$ , 计算得到预测的 $x_0 = \frac{1}{\sqrt{\bar{\alpha_t}}}x_t-\sqrt{\frac{1}{\bar\alpha_t}-1}\epsilon_\theta(x_t,t)$
- 计算 $q(x_{t-1} | x_t, x_0) = \mathcal{N}(x_{t-1},\tilde{\mu_t}(x_t,x_0),\tilde{\beta_t}I)$ 当中的均值和方差,
即 $\tilde{\mu_t}(x_t,x_0)=\frac{\sqrt{\bar\alpha_{t-1}}\beta_t}{1-\bar\alpha_t}x_0+\frac{\sqrt{\alpha_t}(1-\bar\alpha_{t-1})}{1-\bar\alpha_{t}}x_t$ - 利用重参数采样技巧,得到 $x_{t-1}=\tilde{\mu_t}(x_t,x_0)+\sigma_tz$ ,其中$\sigma_t=exp (\frac{1}{2}\log{\tilde{\beta_t}})=\sqrt{\tilde{\beta_t}}$
 1def denoising_step(x, t, *,
 2                   model, #预测噪声的模型
 3                   logvar,#方差对数
 4                   sqrt_recip_alphas_cumprod,
 5                   sqrt_recipm1_alphas_cumprod,
 6                   posterior_mean_coef1,
 7                   posterior_mean_coef2,
 8                   return_pred_xstart=False):
 9    # 1.得到模型预测的噪声ε_θ
10    model_output = model(x, t)
11    # 2.预测x_0
12    pred_xstart = (extract(sqrt_recip_alphas_cumprod, t, x.shape)*x -
13                   extract(sqrt_recipm1_alphas_cumprod, t, x.shape)*model_output)
14    pred_xstart = torch.clamp(pred_xstart, -1, 1)#将输入张量各元素限制在[-1,1]
15    # 3. 计算均值与方差
16    mean = (extract(posterior_mean_coef1, t, x.shape)*pred_xstart +
17            extract(posterior_mean_coef2, t, x.shape)*x)
18    logvar = extract(logvar, t, x.shape)
19    # 4. 从高斯分布中采样z
20    noise = torch.randn_like(x)
21    mask = 1-(t==0).float() # t=0时,没有噪声
22    mask = mask.reshape((x.shape[0],)+(1,)*(len(x.shape)-1))
23    sample = mean + mask*torch.exp(0.5*logvar)*noise
24    sample = sample.float()
25    if return_pred_xstart:
26        return sample, pred_xstart
27    return sample
从第12行开始多次出现的extract()是用来提取系数的。
5. diffusion_step方法在diffuse()第8行被调用,完成了 $q(x_t | x_{t-1})$ 扩散采样过程,与去噪过程相比,简单得多:直接计算得到 $x_t=\sqrt{\alpha_t}x_{t-1}+\sqrt{1-\alpha_t}\epsilon_t$ .
1def diffusion_step(x, t, *,
2                   noise=None,
3                   sqrt_alphas,
4                   sqrt_one_minus_alphas):
5    if noise is None: #从高斯分布中采样噪声ε
6        noise = torch.randn_like(x)
7    return (extract(sqrt_alphas, t, x.shape) * x +
8            extract(sqrt_one_minus_alphas, t, x.shape) * noise)